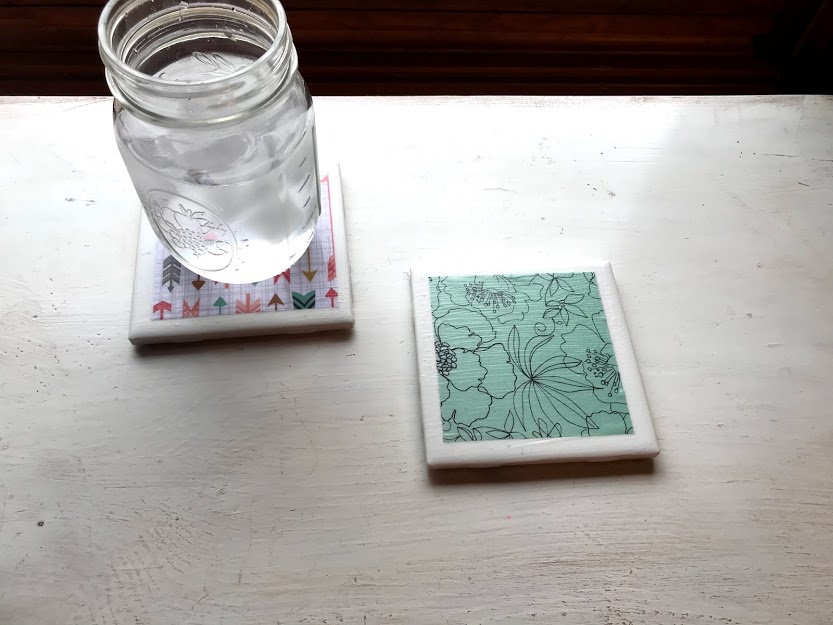
We recently got new living room furniture and I wanted some cute coasters to place on the end tables. Well, I couldn’t find any cute ones that I liked. So, like usual I decided to make some.
I knew I could easily make coasters out of ceramic tile. I’ve seen posts where coasters have photos on them. I thought about using the kids photos for these coasters, but I decided to use cute scrap booking paper.
I got all of the supplies needed at my local Walmart, except the tile which I bought at Lowe’s. I bought plain 4″ which ceramic tile, like the kind you use around a shower. They were $0.16 each!! So, yes I spend 64 cents on 4 tiles!!!
I bought Mod Podge, Scrap Book Paper and Black Felt from Walmart. You can get the small bottles of Mod Podge for about $1 and the sheet of Black Felt cost about $0.25. The Scrap Book Paper was the most expensive item I purchased. It was just under $6 for a book. I didn’t have any paper at home and really wanted to buy sheets individually but my Walmart did not do that. I opted for the book since my girls could use it later for scrap booking.
Other materials needed are scissors, a ruler, and a paint brush. I used the a small foam brush. I already had the Fiskar paper cutter from when I used to do scrap booking. I wanted to use it so I would have clean edges.
Another item that I ended up using was clear matte finish spray paint. I didn’t think I would need this at first, as I though the Mod Podge would give the coaster a perfect finish. But I found the Mod Podge to be sticky and drinks were sticking to the coasters. After I sprayed them with clear paint, the were no longer sticky.
Let’s get started!!

Materials Needed to Make Tile Coasters:
- 4 – 4″ White Ceramic Tiles
- 4 – 3.5″ pieces of scrap book paper (below is the exact scrap book paper I bought from Walmart), photos, any paper, etc. (You can use anything you wish; music notes, book pages, a family members handwriting, etc. Get creative)
- Scissors
- Ruler
- 1 – 8 x 11″ Sheet of Felt
- 2 oz Mod Podge
- Foam Paint Brush
- Clear Spray Paint (or any other sealer)
- Optional: Paper Trimmer

Step 1: Cut the Paper
Cut your paper, or photos, to 3.5″ square. I wanted a small white border to show on the outside. If you do not want a border, then cut your paper to 4″.


Step 2: Glue Paper to Tile
Using the Mod Podge and brush, glue the scrap book paper to the center of a tile. Try to smooth out all of the air bubbles. This may be impossible, just do the best you can.
Allow to dry for about 30 minutes.


Step 3: Apply Mod Podge over the Top
Cover the top of the tile with a layer of Mod Podge. I added 3 coats to each of my coasters, allowing 20-30 min to dry between each coat.


Try to smooth out any air bubbles with each coat that you apply.

Step 4: Cut & Apply the Felt
Cut the Felt in to 4″ squares. Use Mod Podge and glue the felt to the bottom of each piece of tile. Allow to dry.

Step 5: Seal the Coasters
Use Clear Spray Paint to seal the coasters. I use matte finish but gloss would also work. If you skip this step, the mod podge will be sticky and your drinks will stick to the coasters.

And that’s all! Now you have some super cute tile coasters and they make perfect gifts.
Check out other posts from Crochet It Creations below!

Hello
Won’t the mod podge cover up the photo? Do I not rub the paper off with water when it’s dry before sealing it? Thank you
I’m having issues with stickiness even after using a sealant. What clear spray paint did you use?
I used Rustoleum brand. Mine were a little sticky too at first and had to add a few coats.