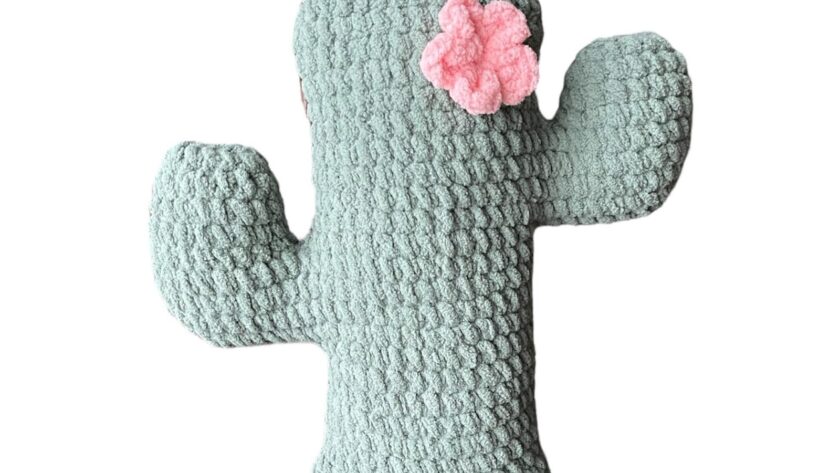
Grab some Bernat Blanket yarn and let’s make this adorable cactus!
Finished cactus measures approximately 10″ tall. It is perfect for your bedroom or home decor. If you prefer to have a PDF pattern to print, please purchase HERE from Etsy. Thank you so much for each and every purchase that helps support this blog!
Cactus Crochet Pattern

Crochet Pattern by Jessica Cooper
Copyright 2022
Materials Needed
- J 6mm Crochet Hook
- Bernat Blanket Yarn in Smoky Green (6 Super Bulky, 100% Polyester, 10.5 oz/300g, 220yds/201m)
- Scissors
- Tapestry Needle
- Poly-Fil
- Optional Pink or Coral Yarn to Add Flower
Gauge
- 4” square = 9 rows x 12 SC stitches
Stitches Used/Abbreviations (US Terms)
- SC – Single Crochet
- SC2TOG – Single Crochet 2 Stitches Together
- DC – Double Crochet
- Sl St – Slip Stitch
- Ch – Chain
- St(s) – Stitch(es)
Pattern Notes
- Beginning chain DOES NOT count as a stitch.
- Finished cactus measures approximately 10” tall.
Working from the bottom up
Rnd 1: Ch 17, SC in 2nd ch from hook, SC in each ch across. Do not turn, continue working on the other side. SC in each ch across, join. (32)
Rnd 2 – 9: Ch 1, SC around, join. (32)

Adding Right Branch
Rnd 10: Ch 8, 2SC in 2nd ch from hook, SC in 6 chains, continue to SC in each st around the body of the cactus, SC in 6 chains, 2SC in last ch, join. (48)

Rnd 11: Ch 1, 2SC in first st, SC around, 2SC in last st, join. (50)
Rnd 12: Ch 1, 2SC in first st, SC around, 2SC in last st join. (52)
Rnd 13 & 14: Ch 1, SC around, join. (52)

Working the Right Branch Only
Rnd 15: Ch 1, SC in 9 sts, skip 34 sts, SC in remaining 9 sts, join. (18)
Rnd 16 – 17: Ch 1, SC around, join. (18)

Rnd 18: Ch 1, SC2TOG, SC in 5 sts, SC2TOG x 2, SC in 5 sts, SC2TOG, join. (14)
Rnd 19: Ch 1, SC2TOG, SC in 3 sts, SC2TOG x 2, SC in 3 sts, SC2TOG, join. (10)
Fasten off, leaving a long tail to sew the top together.

Adding Left Branch
Count over 16 sts from the right branch, join with a slip stitch in the next stitch.

Rnd 15: Ch 8, 2SC in 2nd ch from hook, SC in 6 chains, SC in the same st as the sl st, SC in 15 sts, leave last st unworked. Turn over and work on the other side of the cactus. Skip the first stitch next to the right branch. SC in 16 sts. (48)

Rnd 16: Ch 1, 2SC in first st, SC around, 2SC in last st, join. (50)
Rnd 17: Ch 1, 2SC in first st, SC around, 2SC in last st join. (52)
Rnd 18 – 19: Ch 1, SC around, join. (52)

Working the Left Branch Only
Rnd 20: Ch 1, SC in 9 sts, skip 34 sts, SC in remaining 9 sts, join. (18)
Rnd 21: Ch 1, SC around, join. (18)
Rnd 22: Ch 1, SC2TOG, SC in 5 sts, SC2TOG x 2, SC in 5 sts, SC2TOG, join. (14)
Rnd 23: Ch 1, SC2TOG, SC in 3 sts, SC2TOG x 2, SC in 3 sts, SC2TOG, join. (10) Fasten off, leaving a long tail to sew the top together.

Top the Cactus
On the back side, join with a slip stitch to the second stitch next to the left branch (leaving the first stitch unworked).

Rnd 20: Ch 1, SC around in 32 sts, leaving the last stitch on the front unworked, join. (32)
Rnd 21 – 24: Ch 1, SC around, join. (32)
Rnd 25: Ch 1, SC2TOG, SC in 12 sts, SC2TOG x 2, SC in 12 sts, SC2TOG, join. (28)
Rnd 26: Ch 1, SC2TOG, SC in 10 sts, SC2TOG x 2, SC in 10 sts, SC2TOG, join. (24)
Rnd 27: Ch 1, SC2TOG, SC in 8 sts, SC2TOG x 2, SC in 8 sts, SC2TOG, join. (20) Fasten off, leaving a low tail to sew the top together.

Stuff the Cactus with Poly-Fil. Take the yarn tales and a tapestry needle to sew the top of the body and the branches across with a mattress stitch. Also sew the gaps together between the branch and the body. If your edges are pointy, shape them with the tapestry needle.

Flower
In a magic ring, [Ch 2, DC, Ch 2, sl st in ring] x 5. Close the magic ring, fasten off leaving a tail to sew to the cactus.

Save for later or share with others using the share buttons at the top and bottom of post. If you have any questions please comment below or you can email me at jessica@crochetitcreations.com.
I love to see photos of your work and read your comments. Follow Crochet It Creations on all of your favorite social media sites! Join my Crochet It Creations Crochet Friends Facebook group to further connect!
You may sell your items made from my patterns. Please do not use my photos as your own to sell your work. A link back to my site is much appreciated when selling your items from my patterns. I hope you enjoy!
This site is supported by advertisers and may contain affiliate links. See copyright & disclosure policy here for more information.