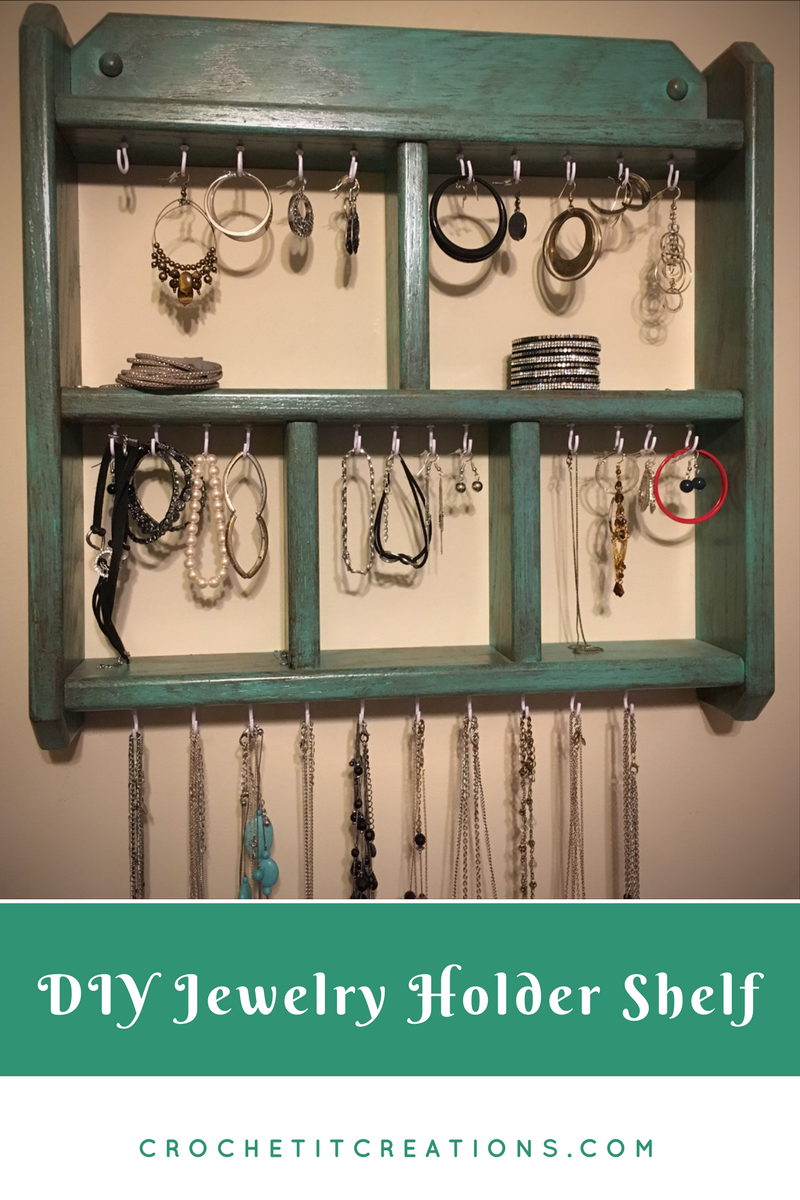
Make your own DIY Jewelry Holder Shelf to hang all of your favorite jewelry on display.
I’ve always had a small jewelry box that sits up on my dresser. It never really held all of my jewelry. A few years ago I bought one that hangs up on the wall. But even with that I had to use both of them because they didn’t hold it all. My necklaces didn’t have room to hang so they would get tangled up. With that being said I got the idea to take an old wooden shelf and turn it into a jewelry holder.

This shelf was actually left in our house when we bought it. It was in the office and served no purpose for us. So it was a bonus when I didn’t have to buy one!
Materials needed:
Spray paint or other paint
Wood Stain (I made this around the time I was staining our garage. I’m pretty sure I used minwax gel stain in hickory on this also)
Cup Screw Hooks (I bought Ook 7/8″ from Walmart 40 pack)
Pliers for screwing in the hooks
Drill to start the screw holes
Sand paper
Prepping
I started out by cleaning the shelf off with soap and water. Then I sanded and sanded as much as I could. I did not sand it all the way down, but did the best I could to roughen it up. Then clean again to get all of the sand dust off.
Painting and staining
I had extra spray paint sitting around. It was a teal color and I thought it would be perfect to go under wood stain. I spray painted at least 2 coats, with drying about 2 hours between. This gives it good coverage. After the paint was dry, I used an old brush and applied the stain. Going with the wood grain. I only applied one coat of stain because I just wanted it to give that antique feel. I wanted most of the base color to show through. I let the stain dry overnight before moving on to the hooks.
Adding hooks
The adding of the hooks was the most difficult part just because of the angle you are placing them. Within the shelves you don’t have a straight on shot for screwing them in. I started off by measuring the width of each opening to decide how far apart I wanted the hooks. I marked where I wanted them with a pencil. After that I took a drill with a small drill bit on it and drilled a little on each pencil markings. Again, this will be difficult because the drill will be at an angle due to the shelves. This is why I didn’t drill too far, just enough to get it started. Then I took the hooks and started screwing them in as much as I could by hand. After that I used pliers to screw them in the rest of the way. I did need my husbands help for a few of them because they were hard to get in. And a few also broke off so be careful!!!
And that is it!! Just hand it up on the wall. You now have a simple DIY jewelry holder shelf that your necklaces can hand all the way down and not worry about getting tangled up. And you can use the shelves to store extra jewelry such as rings or wide bracelets. I have all of my dangly and hoop earrings hanging.
It holds so much! And they are all on display!

I hope you enjoy! Feedback is always appreciated. Don’t forgot to follow Crochet It Creations on all of your favorite social media sites Pinterest, Facebook, Instagram, and Ravelry!
For other DIY ideas check out my garage door refinish with Minwax gel stain and spray paint light fixture upgrade.