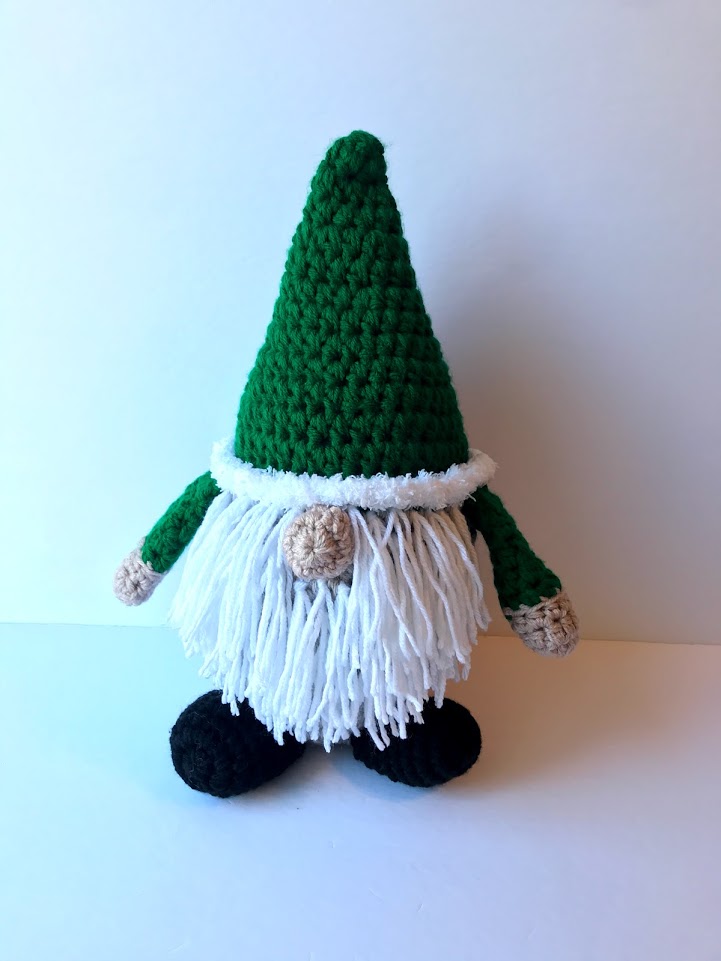
Gnomes are every where this year! This cute little guys bring are adorable and are perfect for Christmas decor.
This Gnome Crochet Pattern is a fairly large size amigurumi measuring about 14″ tall. Use Bulky Weight yarn or 2 strands of Worsted Weight Yarn held together. Worsted Weight Yarn can typically be less expensive, so can be a perfect option for this pattern. Value yarn also works well for amigurumi, like Red Heart Super Saver.
This Gnome Crochet Pattern is worked from the top down. The body and the hat is in one piece. Make and attach the arms, feet, and nose after. Then, attach the strands of yarn for the beard. Poly-Fil is needed to stuff the Gnome.

Gnome Crochet Pattern
Pattern Notes
- Finished Gnome measures approximately 14” tall x 7” wide.
- Gnomes are worked from the top down.
- Beginning chain DOES NOT count as a stitch.
- Pattern comes in 2 options: Pointed Hat and Pom Pom Hat.
Materials Needed
- J 6mm Crochet Hook
- Any Medium 4 Weight Yarn using 2 strands held together, or 1 strand of bulky yarn
- Color A (Red) – 200 yards
- Color B (Grey) – 175 yards
- Color C (White) – 100 yards
- Colo YYYHr D (Tan) – 50 yards
- Color E (Black) – 75 yards
- Optional to use Bernat Pipsqueak Yarn in White for the Hat, about 50 yards.
- Scissors
- Tapestry Needle
- Poly-Fil
Gauge
- 2 Rows x 2 HDC – 1”
Stitches Used/Abbreviations (US Terms)
- SC – Single Crochet
- HDC – Half Double Crochet
- Sl St – Slip Stitch
- Ch – Chain
- HDC2TOG – Half Double Crochet 2 Stitches Together
- St(s) – Stitch(es)
- BLO – Back Loop Only
Option 1: Pointed Hat Version
Hat
Using Color A, holding 2 strands together
Rnd 1: Ch 1, place 6 HDC in magic ring, pull tight, join. (6) *optional to work in a spiral instead of joining, use a stitch marker to mark the last st of each rnd, there will be no need to ch 1 at the beginning of each rnd*
Rnd 2: Ch 1, HDC in each st around, join. (6)
Rnd 3: Ch 1, 2HDC in each st around, join. (12)
Rnd 4: Ch 1, HDC in each st around, join. (12)
Rnd 5: Ch 1, [HDC in 1 st, 2HDC in next st] around, join. (18)
Rnd 6: Ch 1, HDC in each st around, join. (18)
Rnd 7: Ch 1, [HDC in 2 sts, 2HDC in next st] around, join. (24)
Rnd 8: Ch 1, HDC in each st around, join. (24)
Rnd 9: Ch 1, [HDC in 3 sts, 2HDC in next st] around, join. (30)
Rnd 10: Ch 1, HDC in each st around, join. (30)
Rnd 11: Ch 1, [HDC in 4 sts, 2HDC in next st] around, join. (36)
Rnd 12: Ch 1, HDC in each st around, join. (36)
Rnd 13: Ch 1, [HDC in 5 sts, 2HDC in next st] around, join. (42)
Rnd 14: Ch 1, HDC in each st around, join. (42) *If working in a spiral be sure to join on last rnd* Fasten off.
Photo 1: Magic Ring for Hat
Photo 2: Tip of Hat

Photo 3: Finished Hat
Body
Using Color B, holding 2 strands together. Join with Sl St to rnd 14 and continue working from hat.
Rnd 15: Ch 1, HDC in each st around in BLO, join. (42)
Rnd 16 – 25: Ch 1, HDC in each st, join. (42)
Rnd 26: Ch 1, [HDC in 4 sts, HDC2TOG] around, join. (35)
Rnd 27: Ch 1, [HDC in 3 sts, HDC2TOG] around, join. (28)
Rnd 28: Ch 1, [HDC in 2 sts, HDC2TOG] around, join. (21)
Rnd 29: Ch 1, [HDC in 1 st, HDC2TOG] around, join. (14)
Rnd 30: Ch 1, HDC2TOG in each st around, join. (7) Fasten off leaving a long tail for closing the center. Stuff with Poly-Fil, close bottom.
Photo 4: Body in Grey worked in BLO
Trim Around Hat
Using Color C or pipsqueak yarn, attach to Front Loop of Rnd 14 with a sl st. Ch 1, SC in each st around, join. (42) Fasten off.
Photo 5: White Row in FLO for Hat
Nose
Using Color D, holding 2 strands together.
Rnd 1: Ch 1, place 12 SC sts in magic ring, pull tight, join. (6)
Rnd 2 – 3: Ch 1, SC around, join. (12) Finish off, leaving a long tail to sew on. Attach to center directly under hat.
Photo 6: Finished Nose
Photo 7: Attach nose to center under the white round.
Beard
Cut 6” pieces of Color C. Do this easily by wrapping around a small notebook about 100 times. Take 2 pieces and tie on to the first 5 rows of the front of the Gnome, leaving the nose open.
Photo 8: Wrap yarn around a small notepad for strips.
Photo 9: Knot 2 strands of White to the front starting under hat.
Photo 10: Use crochet hook to knot strands on.
Photo 11: Completed Beard Hair
Feet
Using Color E, holding 2 strands together.
Rnd 1: Ch 1, place 10 HDC in magic ring, pull tight, join. (10)
Rnd 2: Ch 1, [HDC in 1 st, 2HDC in next] repeat, join. (15)
Rnd 3 – 4: Ch 1, HDC around, join. (15)
Rnd 5: Ch 1, [HDC in 3 sts, HDC2TOG] around, join. (12)
Rnd 6: Ch 1, [HDC in 2 sts, HDC2TOG] around, join. (9) Fasten off leaving a long tail for sewing on. Stuff with Poly-Fil and sew on to the bottom of Gnome.
Photo 12: Attach Feet
Arms
Using Color D, holding 2 strands together.
Rnd 1: Ch 1, place 10 HDC in magic ring, pull tight, join. (10)
Rnd 2 – 3: Ch 1, HDC around, join. (10)
Change colors to Color A.
Rnd 4: Ch 1, HDC around in BLO, join. (10)
Rnd 5 – 8: Ch 1, HDC around, join. (10) Fasten off, leaving a long tail for attaching. Stuff the hand with Poly-FIl and sew just under the hat. See photos 14 & 15.
Photo 13: Finished Arm
Photo 14: Attach arm directly under hat.
Find the PDF Pattern with both the Pointed Hat and Pom Pom Hat Styles on Etsy.
Save for later or share with others using the share buttons at the top and bottom of post. If you have any questions please comment below or you can email me at jessica@crochetitcreations.com.
I love to see photos of your work and read your comments. Follow Crochet It Creations on all of your favorite social media sites! Join my Crochet It Creations Crochet Friends Facebook group to further connect!
You may sell your items made from my patterns. Please do not use my photos as your own to sell your work. A link back to my site is much appreciated when selling your items from my patterns. I hope you enjoy!
This site is supported by advertisers and may contain affiliate links. See copyright & disclosure policy here for more information.


