Prefer a PDF version to print? Click here https://www.ravelry.com/patterns/library/fringe-infintiy-scarf
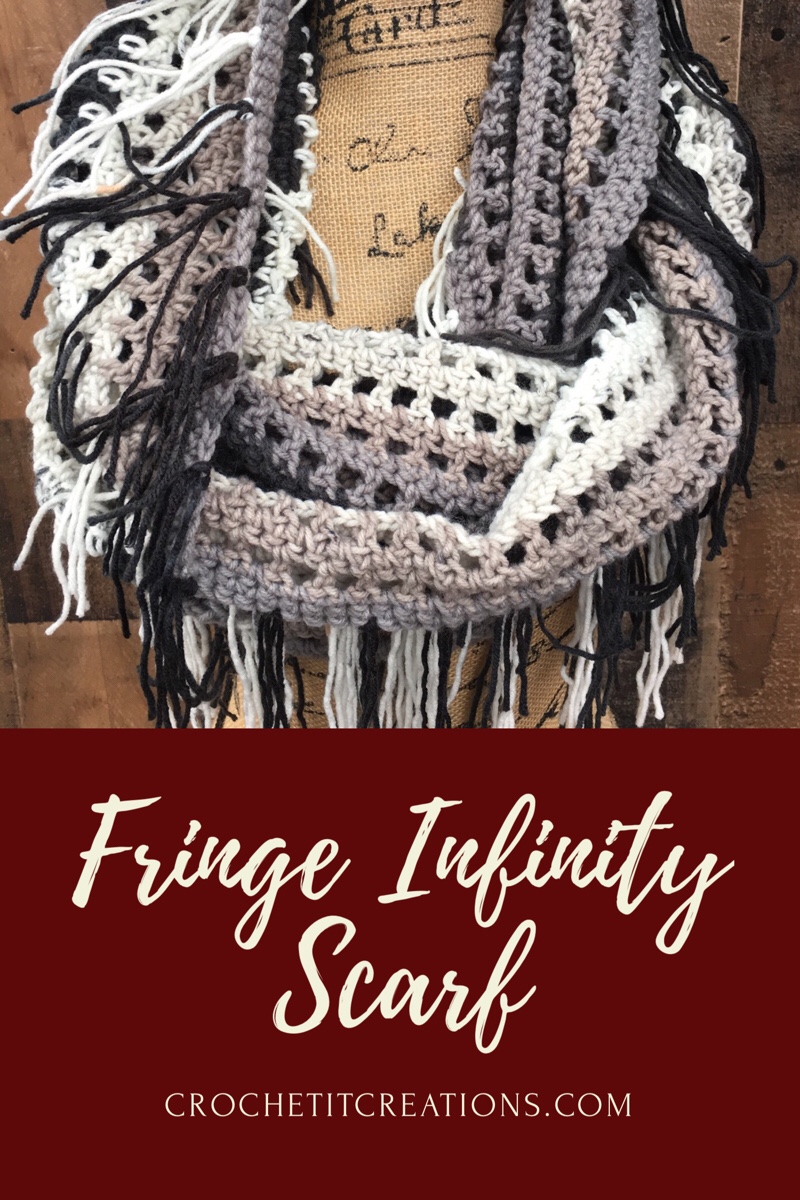
Scarves are always a popular item to make. They keep you warm and are fashionable! They are perfect to make for gifts. There are many different styles: infinity, traditional, triangle, wrap, blanket, etc. I have recently seen many of the cute fringe ones in boutiques and I wanted to recreate one to share with you all!
I had a Cookie Crumble Caron Big Cakes just sitting around screaming for me to make a scarf out of it! The variation of grays is just perfect. Plus this yarn is so soft and easy to work with. This yarn calls for a H hook but I used a K 6.5 mm hook for extra stretch and give. It uses exactly 1 skein!! I guess it’s a 1 skein wonder pattern!!!!
It works in a circle alternating sc rows and dc ch 1 rows. I began with a foundation sc row instead of a ch because the foundation rows stretch more. See here how to make a foundation row.

An ad-free PDF file of the pattern can be purchased from Craftsy for a small fee …. here

Materials Needed
-
- size K 6.5 mm crochet hook – Clover Amour is my favorite
-
- worsted weight yarn, approximately 600 yds (I used Caron Big Cakes) it uses 1 WHOLE skein!! Yay!
-
- scissors
-
- yarn needle
- a credit card for making the fringe or a phone for a slightly longer fringe (I’ll show ya my trick that I use)
Stitches Used
-
- Ch = chain
When making slip knot for to begin, leave a long tail. You will need to connect the bottom end of the foundation row.
Row 1: start with a foundation sc row of 220 sc. (or you can ch 221 and sc in second ch from hook and across) sl st to connect the loop to the first sc. careful not to twist row. (220 sc) See here how to make foundation rows.
Row 2: ch 4, *skip a sc, dc in next sc, ch 1* repeat this sequence across. ending with ch 1 and sl st to first dc. Join
Row 3: ch 1, sc in each st across (1 sc in each dc and 1 sc in each ch space). Join (220 sc)
Rows 4 – 25: repeat rows 2 and 3 join
Row 26: ch 1 sc in each st across. join. finish off.
Weave in end and close row 1’s foundation row with beginning tail. Weave in that end also.
Attach yarn on foundation sc row on the opposite side that you worked row 26 on. Ch 1 sc across. Sl st to first st. This gives it nice edging on each side of the scarf. Weave in yarn ends.
You can leave it here as an infinity scarf or move on to adding fringe!
Adding Fringe
cut approx 6-8″ strips of yarn. Wrap yarn around a credit card or phone long ways many times like on the photo.


This will give you nice even strips of yarn without measuring and cutting a million times.
Attach 2 strips of yarn to one of the sc rows using a knot. I lined mine up with the dc and did about every other dc. This puts a fringe every 4 sc.
Here’s a video of how to tie the fringe on the scarf.

And there you have it! A beautiful fringe infinity scarf!
Prefer a PDF version to print? Click here https://www.ravelry.com/patterns/library/fringe-infintiy-scarf

Save for later or share with others using the share buttons at the top and bottom of post. If you have any questions please comment below or you can email me at jessica@crochetitcreations.com.
I love to see photos of your work and read your comments. Follow Crochet It Creations on all of your favorite social media sites! Join my Crochet It Creations Crochet Friends Facebook group to further connect!
You may sell your items made from my patterns. Please do not use my photos as your own to sell your work. A link back to my site is much appreciated when selling your items from my patterns. I hope you enjoy!
This site is supported by advertisers and may contain affiliate links. See copyright & disclosure policy here for more information.
How did you get the different colors to be in perfect rows?? I have like a row that’s half white and half black. Your scarf is so beautiful!!!
Thank you! I honestly think it just worked out that way. Since your wrapping it in half to wear, you won’t notice the color changes. I did notice that the second one I made had more drastic color changes than the first.
How long did your scarf end up being? Mine seems like it’s longer. Thanks!
about 68″ total
[…] Infinity scarf uses foundation SC – https://www.crochetitcreations.com/so-admin/fringe-infinity-scarf/ […]
I have a request to make this scarf. What should I charge?
I can’t give you an exact price but I do suggest to not under value yourself. I often sell my items and charge by the hour plus cost. I only sell items I am familiar with making.
… [Trackback]
[…] Find More Informations here: crochetitcreations.com/fringe-infinity-scarf/ […]
… [Trackback]
[…] There you will find 40675 additional Info on that Topic: crochetitcreations.com/fringe-infinity-scarf/ […]
… [Trackback]
[…] Read More here to that Topic: crochetitcreations.com/fringe-infinity-scarf/ […]
… [Trackback]
[…] Find More to that Topic: crochetitcreations.com/fringe-infinity-scarf/ […]
… [Trackback]
[…] Here you will find 14674 additional Info to that Topic: crochetitcreations.com/fringe-infinity-scarf/ […]
… [Trackback]
[…] Read More on on that Topic: crochetitcreations.com/fringe-infinity-scarf/ […]
… [Trackback]
[…] There you will find 70284 more Information on that Topic: crochetitcreations.com/fringe-infinity-scarf/ […]
… [Trackback]
[…] Info to that Topic: crochetitcreations.com/fringe-infinity-scarf/ […]
… [Trackback]
[…] Find More here to that Topic: crochetitcreations.com/fringe-infinity-scarf/ […]
… [Trackback]
[…] Find More on that Topic: crochetitcreations.com/fringe-infinity-scarf/ […]
… [Trackback]
[…] Read More to that Topic: crochetitcreations.com/fringe-infinity-scarf/ […]
… [Trackback]
[…] Read More to that Topic: crochetitcreations.com/fringe-infinity-scarf/ […]
… [Trackback]
[…] Information on that Topic: crochetitcreations.com/fringe-infinity-scarf/ […]
… [Trackback]
[…] Find More on on that Topic: crochetitcreations.com/fringe-infinity-scarf/ […]
… [Trackback]
[…] Info on that Topic: crochetitcreations.com/fringe-infinity-scarf/ […]
… [Trackback]
[…] Read More Info here on that Topic: crochetitcreations.com/fringe-infinity-scarf/ […]
… [Trackback]
[…] Read More Info here on that Topic: crochetitcreations.com/fringe-infinity-scarf/ […]
… [Trackback]
[…] Read More here on that Topic: crochetitcreations.com/fringe-infinity-scarf/ […]
… [Trackback]
[…] Here you can find 3697 more Info on that Topic: crochetitcreations.com/fringe-infinity-scarf/ […]
… [Trackback]
[…] Info to that Topic: crochetitcreations.com/fringe-infinity-scarf/ […]
… [Trackback]
[…] Info on that Topic: crochetitcreations.com/fringe-infinity-scarf/ […]
… [Trackback]
[…] Find More here on that Topic: crochetitcreations.com/fringe-infinity-scarf/ […]
… [Trackback]
[…] Find More on on that Topic: crochetitcreations.com/fringe-infinity-scarf/ […]
… [Trackback]
[…] Find More to that Topic: crochetitcreations.com/fringe-infinity-scarf/ […]
… [Trackback]
[…] Here you will find 1991 additional Info on that Topic: crochetitcreations.com/fringe-infinity-scarf/ […]
… [Trackback]
[…] There you will find 2224 more Info to that Topic: crochetitcreations.com/fringe-infinity-scarf/ […]
… [Trackback]
[…] Read More here to that Topic: crochetitcreations.com/fringe-infinity-scarf/ […]
… [Trackback]
[…] Info to that Topic: crochetitcreations.com/fringe-infinity-scarf/ […]
… [Trackback]
[…] Find More Information here to that Topic: crochetitcreations.com/fringe-infinity-scarf/ […]
… [Trackback]
[…] Find More to that Topic: crochetitcreations.com/fringe-infinity-scarf/ […]
… [Trackback]
[…] Read More on that Topic: crochetitcreations.com/fringe-infinity-scarf/ […]
… [Trackback]
[…] Find More to that Topic: crochetitcreations.com/fringe-infinity-scarf/ […]